There are a lot of great pleasures in life. But moving is not one of them. Especially if you have a treadmill. Which can be particularly difficult to move or sell. To make it a little easier, I’ve put together a quick guide on how to disassemble ProForm Pro 2000 treadmill for moving. Simply reversing the instructions for you step by step. Including pictures and the required tools.
* All images are taken directly from the ProForm Pro 2000 manual.
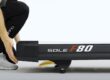
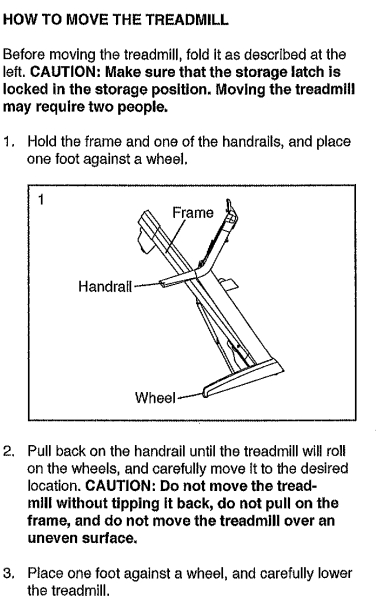
How to Roll / Move the ProForm Pro 2000 Treadmill
Below is an image showing the proper way of moving/rolling the ProForm Pro 2000 treadmill.
A Step by Step Guide on How to Disassemble ProForm Pro 2000 Treadmill
Tools You Will Need
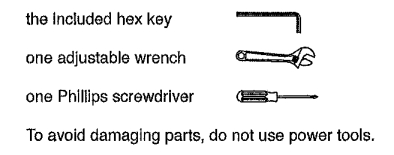
- Hex Head Scree Driver
- Adjustable Wrench
- Phillips Head Screwdriver
* To avoid damaging parts, do not use power tools.
Disassembly Instructions
Before starting, make sure the treadmill is unplugged.
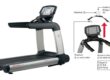
Step 1. Removing Tablet Holder
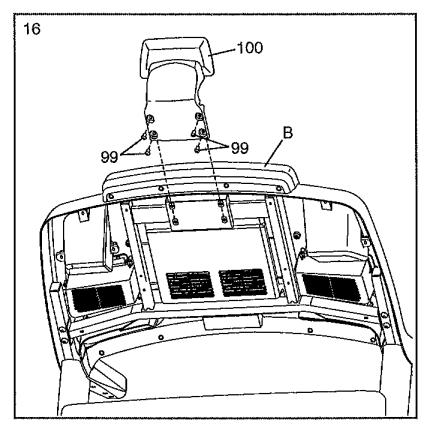
To remove the tablet holder (100) from the top of the treadmill. Just remove the 4 screws (99) attaching it to the back of the treadmill’s console.
Step 2. Disconnecting the Storage Latch (optional)
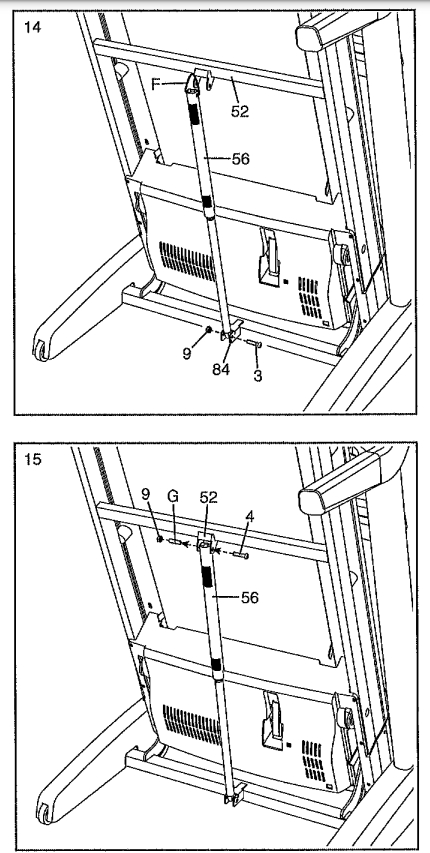
* For this step you are going to want to have someone help hold the treadmill while you remove the latch.
* Removing the storage latch is optional for moving.
First, make sure the treadmill is unplugged. Then raise the frame to the upright position shown in the images. Have someone hold the treadmill. Then you will disassemble the storage latch (56). First remove the upper 5/16” nut (9) and bolt (4) from the frame (52).
Next remove the lower 5/16” nut (9) and bolt (3) from the lower bracket (84).
Step 3. Remove Crossbar Trey
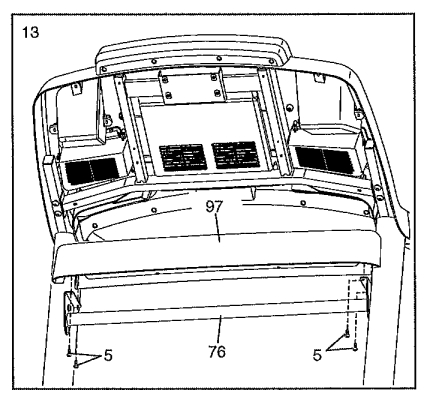
Next, you will remove the crossbar trey (97) from the crossbar (76). Use a screwdriver to remove the 4 screws (5) from under the trey. Then lift to remove.
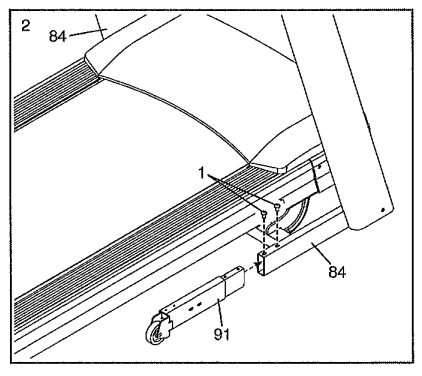
Step 4. Removing Upright Crossbar
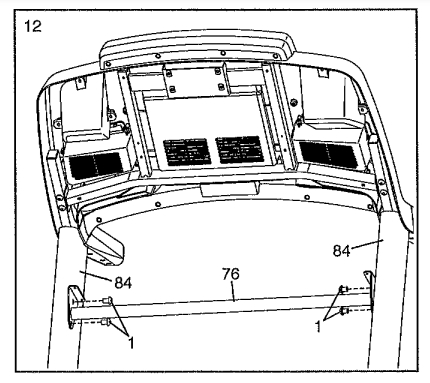
To remove the upright crossbar (76), use the screwdriver to remove 4 screws (1). 2 on each side of the treadmill attaching the crossbar to the upright rails (84).
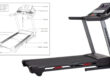
Step 5. Remove Handrail Top & Bottom
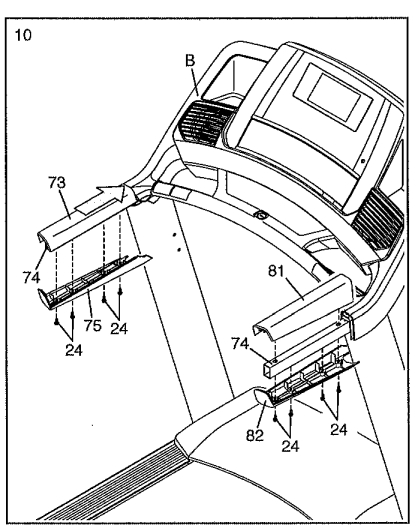
Each side rail has a top and bottom piece. In the diagram you can see the left top (73) and bottom (75). And right side top (81) and bottom (82). Each is held on by 4 screws (24) on the bottom (8 screws in total).
Step 6. Remove Screws from Pulse Crossbar

Remove 4 screws (5) from under the pulse crossbar (80). These are just securing the bar and we’ll remove it with the entire console next.
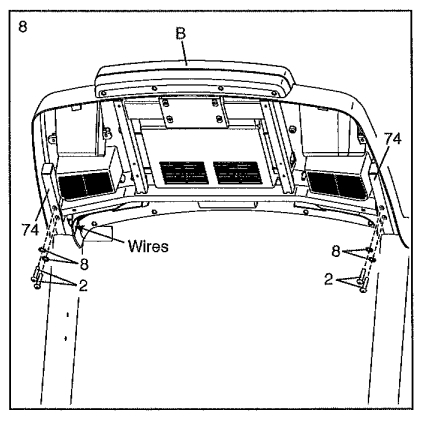
Step 7. Disconnecting Console Assembly from Handrails
* Important, you should have someone to hold the console once you unscrew it. It is connected to the right handrail by a wire. And shouldn’t be pulled more than a few inches from the rail so you can disconnect it.
To remove the console, remove 4 bolts (2) and washers (8), 2 on each side. Running through the handrail (74) and holding the console securely in place.
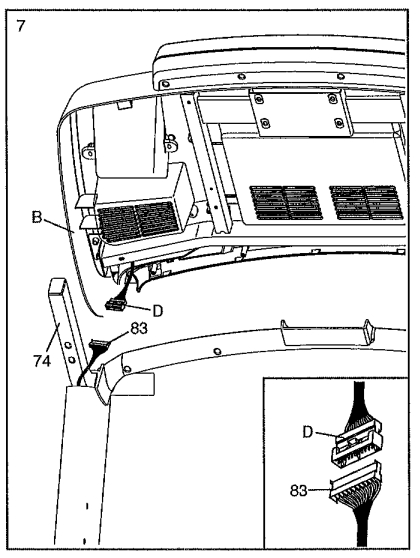
Step 8. Disconnect the Main Wire
Have someone hold the console (B) and slowly move it a few inches exposing the main wire connecting (83 & D) on the right handrail of the treadmill.
Place the main console someplace safe.
Step 9. Remove Pulse Crossbar.
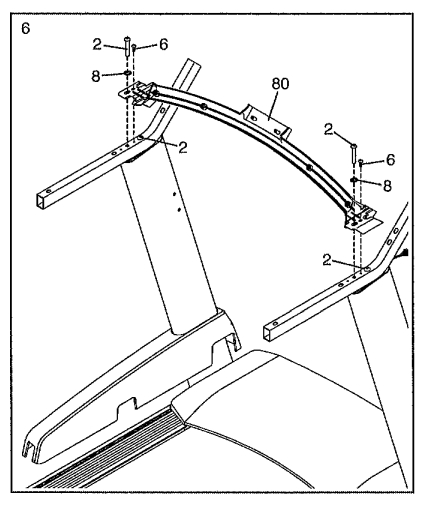
After lifting the console, you will be left with the pulse crossbar (80) connecting the left and right handrails. This bar is held in place by 6 screws (2 & 6) and 2 washers (8). Remove these and then lift out the pulse crossbar and put it somewhere safe.
Step 10. Remove Handrails from Uprights
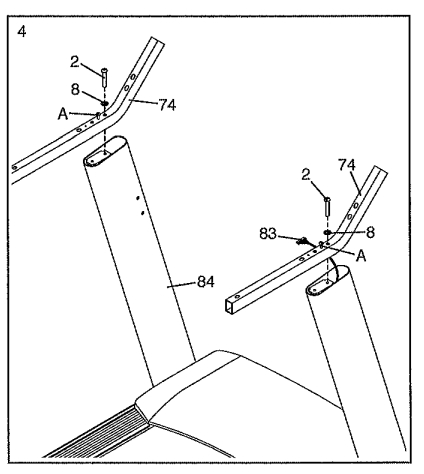
Next remove the handrails (74) from the uprights (84) by removing the 2 main bolts (2) and washers (8).
Step 11. Left Off Left & Right Upright Covers
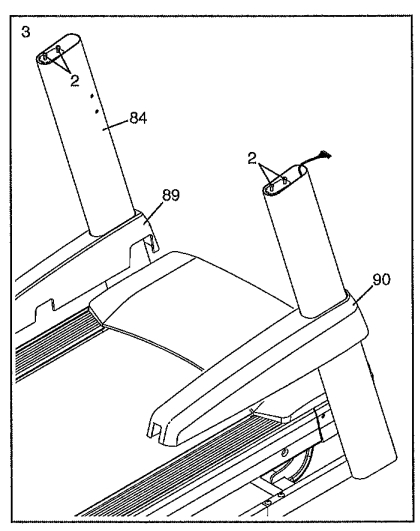
Next, lift off the left (89) and right (90) upright covers off of the uprights.
Step 12. Remove RIght and Left Leg Extensions
Remove 4 screws (1), 2 on each side connecting the wheel extensions to the treadmill frame.
Conclusion
Moving a treadmill, especially a ProForm Pro 2000, can be a challenging task. However, with the right tools and step-by-step guidance, it becomes much more manageable. Remember to unplug the treadmill before you begin the disassembly process to ensure safety. Here’s a quick recap of the key steps:
- Start by removing the tablet holder from the treadmill’s console by taking out the screws attaching it.
- Optionally, disconnect the storage latch, making sure to have assistance in holding the treadmill steady during this step.
- Remove the crossbar trey by unscrewing the screws beneath it.
- Take off the upright crossbar by removing the screws that secure it to the upright rails.
- Remove the top and bottom pieces of the handrails on each side, held in place by screws.
- Unscrew the screws securing the pulse crossbar.
- Carefully disconnect the console assembly from the handrails, ensuring that you have someone to support the console due to the attached wire.
- Disconnect the main wire, and place the console assembly in a safe location.
- Remove the pulse crossbar by unscrewing the screws and washers that hold it in place.
- Detach the handrails from the uprights by removing the main bolts and washers.
- Lift off the left and right upright covers.
- Finally, remove the right and left leg extensions by unscrewing the bolts connecting them to the treadmill frame.
By following these steps and using the specified tools, you can successfully disassemble your ProForm Pro 2000 treadmill for moving or storage. Remember to exercise caution and take your time to ensure the safety of both yourself and the treadmill. Happy moving!