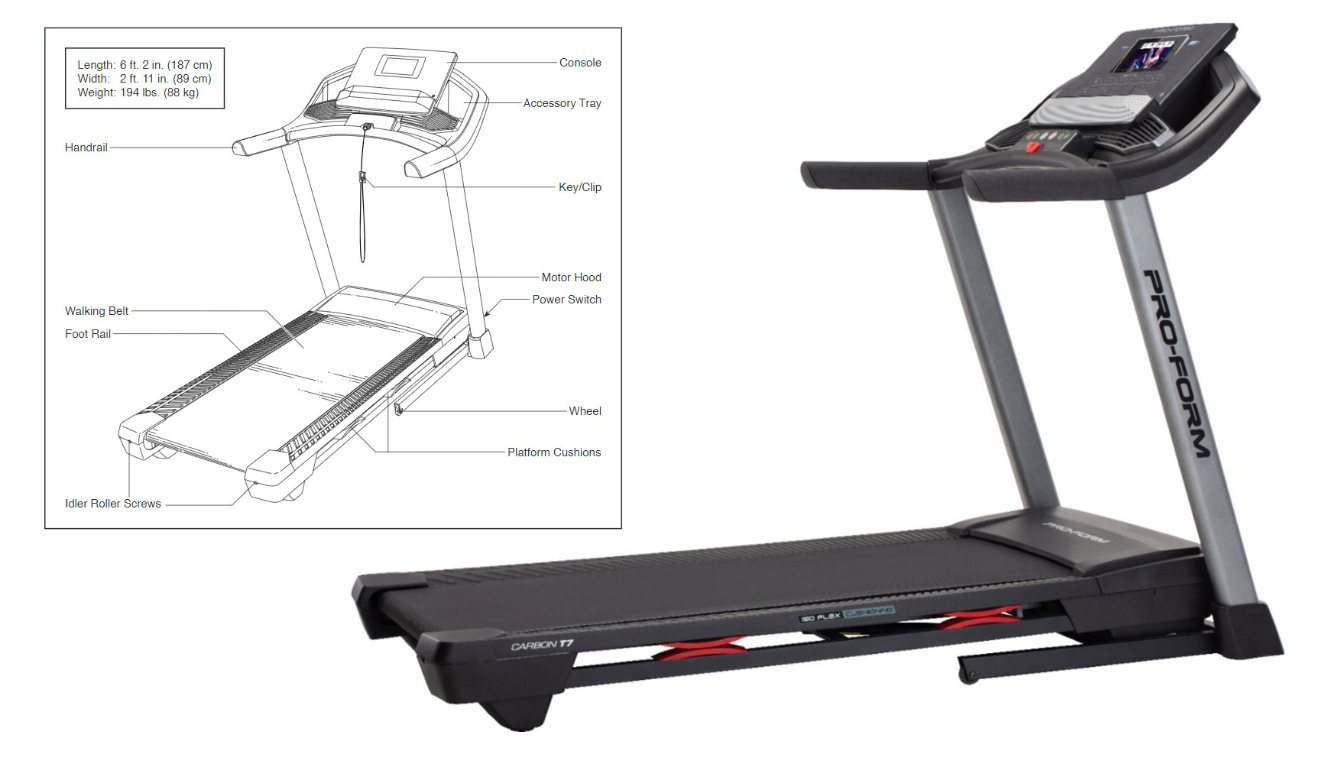
Moving a treadmill is never an easy task, and taking one apart is even harder. Especially with most manufacturers not providing any instructions on how to do it correctly. It doesn’t help either that most people have long since thrown away the manual, which would also be helpful. So, in what has become one of my most commented-on and requested series of posts, today we’ll be looking at how to disassemble the Proform Carbon T7 treadmill. In the following sections, I’ll cover the necessary tools, using pictures from the official manual to guide you step by step through the process. As always, if you have any questions, don’t hesitate to leave a comment or send me a message.
A Step by Step Guide on How to Disassemble a Proform Carbon T7 Treadmill
A couple tips before we get started. First, make sure the treadmill is unplugged before starting and second, having someone that can help will really come in hand for a few of the steps. Also, all images and instructions have been taken directly from the official manual which can be viewed by clicking here.
Tools Needed
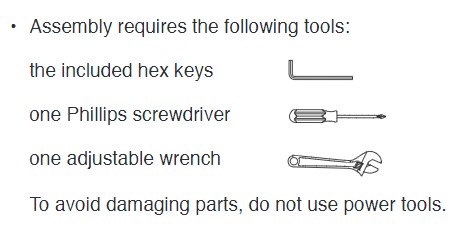
- A Hex Key
- Phillips Head Screwdriver
- Adjustable Wrench
- Blanket – to set the console on.
- Optional – Long string or twine, will explain in instructions.
- Tape
- Optional – Ziplock bag to keep hardware
Proform Carbon T7 Disassembly Guide
Step 1. Remove Inner Base Covers
In the first step we are going to remove the left (95) and right (94) inner base covers that are located on the front inner base. To do this you will need to separate them from the main base covers that wrap around the left and right uprights. These are 92 and 93 in the image. They are connected by a simple snap in, but can be fragile so dont pull them apart with too much force. They should separate by holding the inner base cover down with one hand (95) and then liftin the base cover (93). Then repeat for the other side 4 2. From here the inner base covers should come off by gently lifting from the bottom. We are primarily doing this so they do not break during the rest of disassembly. You will not be unscrewing the blots below just yet.
Step 2. Remove the Deck Storage Latch
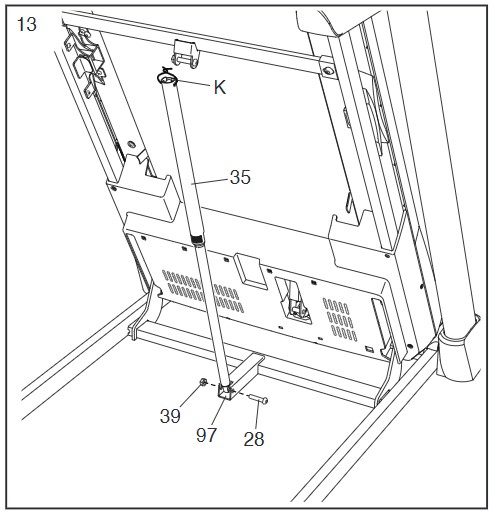
First you will want to raise and lock the treadmill deck into its upright and stored position. From here it helps to have someone help you hold the deck in place while removing the storage latch (35). If you are doing thi by yourself, be careful the deck does not fall on you.
Again, please be careful.
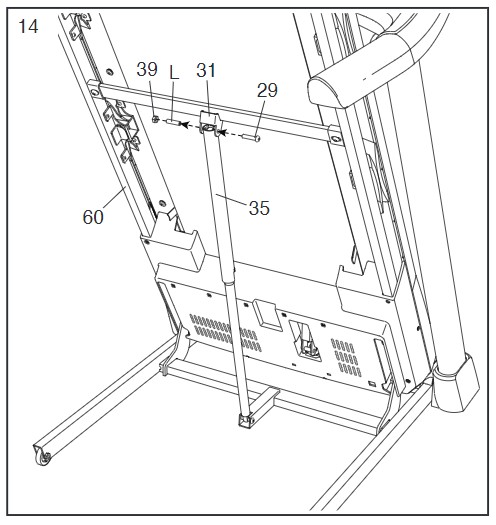
To remove the storage latch (35) you will start by removing the top bolt (29) and nut (39) from the bracket located on the bottom of the deck (31). Once removed and separated, place the bolt back through the storage latch (35) to hold its position for reassembly. Next you will repeat this same process for the bottom connection, removing nut (39) and bolt (28) from the bottom bracket (97). Again, place the bolt and nut back in the latch once separated.
Step 3. Remove Latch Crossbar
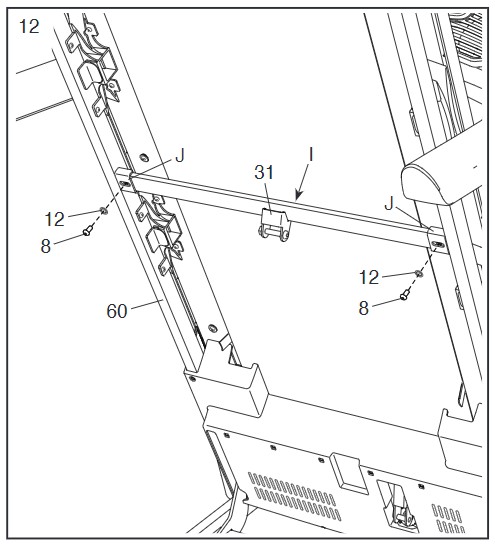
The Latch crossbar (I) is held in place by two screws (8) and washers (12), one on each side of the bar. Just remove these two screws and the latch crossbar will come off.
Once finished, lower the deck to the ground for the next steps.
Step 4. Removing the Right and Left Handle Covers
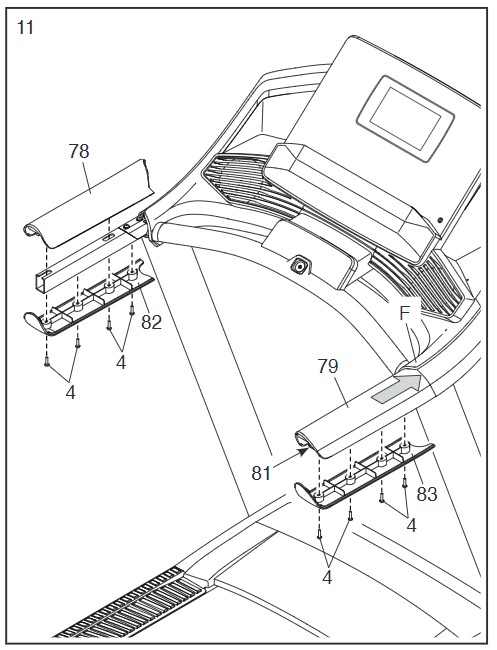
Both the left (78) and right (79) handle covers are held in place by four screws (4) from the bottom. Start by unscrewing them from the bottom and lowering the bottom part of the covers off. The upper covers will be removed by sliding them back away from the main console, and then they should just lift off.
Step 5. Remove Crossbar
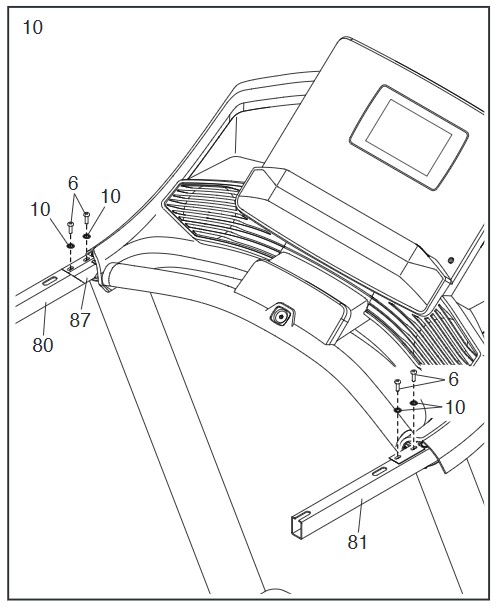
Next we are going to remove the crossbar (87), which is held in place by four screws (6) and washers (10) total. Two each on both sides. Simple remove the two screws from each side and then lift the crossbar out of place.
Step 6. Disconnect the Console from the Uprights
Note: For this step it helps to have someone to help. Once you remove the screws the main console will be loose but you will need to disconnect the main wire, so do not pull it away from the uprights too quickly. There is a very short lead. It does help to have something close by you can set the console onto.
For this step the main console (F) is connected to the left and right handrails by four main screws (24) and washers (10), two on each side. Again, once you uncrews these main four screws the console will move free so make sure to have something or someone to support its weight. Being careful not to move it too far as it is still connected by the main cable in the right upright arm.
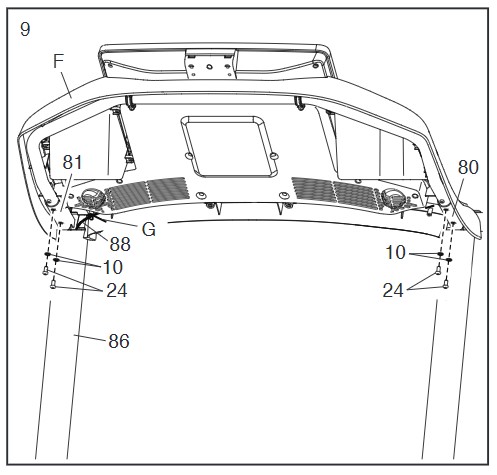
Step 7. Disconnecting the Main Upright Cable
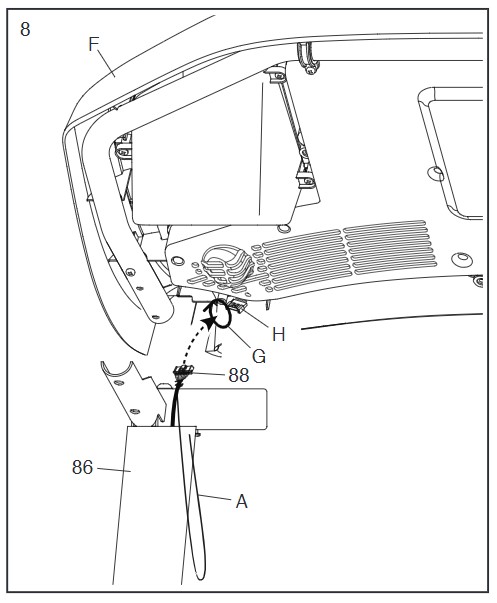
Once you have disconnected the console (F) from the upright (86) you will need to lift it enough to expose the main connecting of the main upright cable (88) This should be a standard “squeez” connection, where you will need to squeeze then pull to separate the two ends.
Note: I recommended taping the end of the cable that is running through the upright to the outside so it doesn’t fall into the upright support arm.
Step 8. Remove the Console Treys
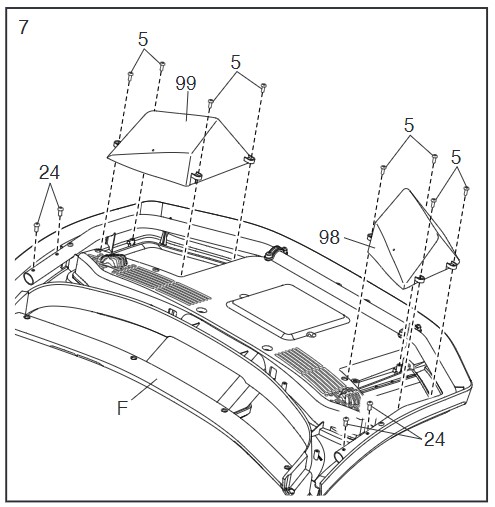
After you have disconnected the main cable from the console, you are going to want to set the console face down on something soft. A towel or blanket will work. From here we are going to remove the left (99) and right (98) treys. You can leave them in if you want, but they can break during transport so it is recommended you remove them.
Each console trey is held in place by four screws (5), making eight in total. Simply remove these screws and then lift the treys from the back of the console.
Step 9. Removing the Handrails
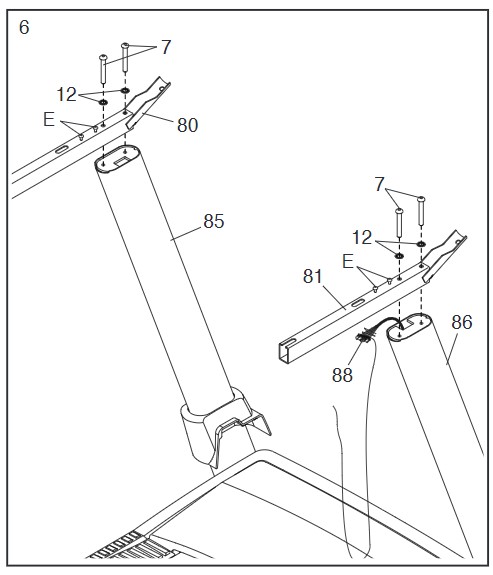
Next we are going to remove the left (80) and right (81) handrails from the upright support columns. Each handrail is connected to the upright by two main screws (7) and washers (12). Once removed, the handrails should just come right off.
Step 10. Remove the Upright Base Cover
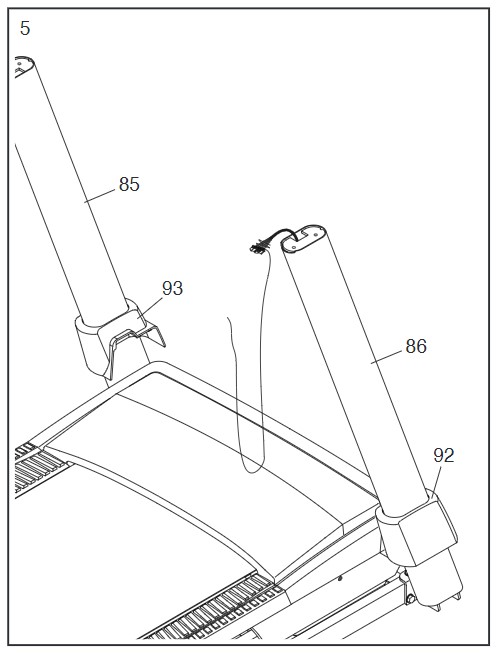
This step is easy, just lift the left (93) and right (92) base covers up and off of the corresponding upright.
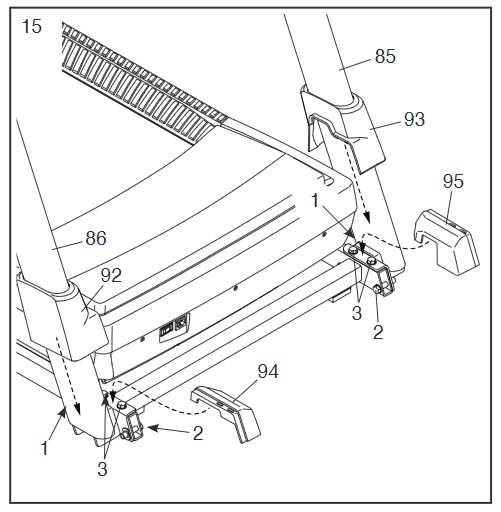
Step 11. Removing the Left and Right Uprights
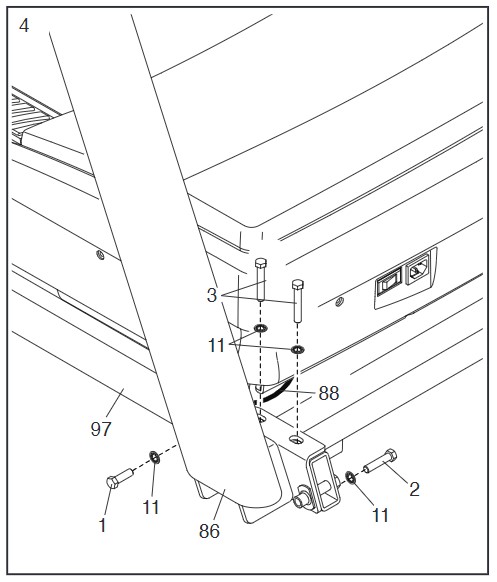
Note: The main console cable is running through the right upright, so be careful when disconnecting it. And make sure to following step 11 to make it easier to re-install.
Both uprights are connected to the treadmill base by four main bolts. Two located on top (3), one on the inside (2) and one on the outside (1). With each having its own washer (11). Once you remove these four screws the upright will separate from the base. Again, be careful with the right upright which has the main console cable running through it. Making sure to follow the next step.
Step 12. Removing the Main Console Cable from Upright
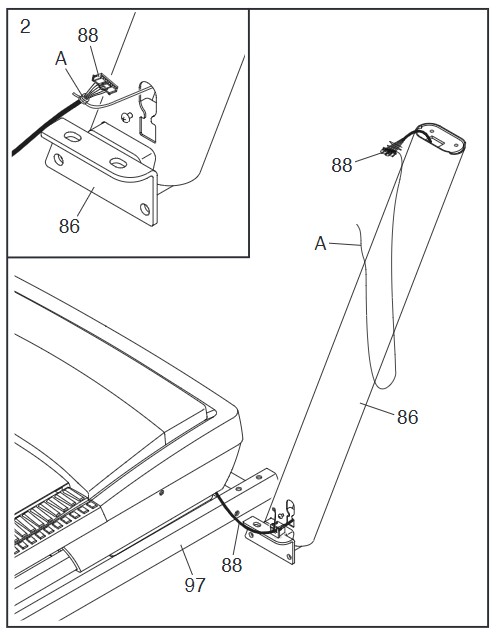
Note: If you are planning on reassembling the treadmill I highly recommend you follow part one of this next step.
Part 1. This step is optional but will make reassembling the treadmill much easier. For this step we are going to be tying a string or twine to the top of the console cable. Making sure that it is long enough to run through the entire right upright. The idea is to run the string through the center of the upright as you pull the cable out. This way, when you want to put the treadmill back together, you can tie the cable to the string and simply pull it back through.
Part 2. Gently pull the cable through the right upright making sure to catch it on anything as you pull it through. If you have followed part 1, you will want to tape one end of the string attached to the cable to the top of the upright. Then once you have pulled the cable and attached string through the console, tape the other side of the string to the bottom of the upright. Again, this will allow you to simply reveres the process, pulling the cable through for reassembly.
And that’s it, you are finished! If you have any questions on how to disassemble the Proform Carbon T7 treadmill just let me know in the comments below.