Hiking the Maroon Bells Four Pass Loop in one day is a bucket list hike for a lot of people. Considered one of the most beautiful backpacking trails in the USA, the alpine loop passes over four 12,000ft passes. Covering 27 miles and 7,500+ft of gain. For many, what started as a backpacking loop has turned into one of the most epic single day adventures in North America.

Below I’ve put together a quick guide to doing Four Pass Loop in one day. With tips and info you will need to be successful.
Key Takeaways:
- Hiking the Maroon Bells Four Pass Loop in one day is an epic adventure in the Rockies.
- The trail covers 27 miles with over 7,500ft of elevation gain and passes four 12,000ft peaks.
- Most hikers choose the counterclockwise route starting with Buckskin Pass for a smoother descent.
- Mid-June to September is the best time for the hike, but be prepared for rapidly changing high-altitude weather.
- Water is abundant along the trail, but it’s essential to carry a water filter and inquire about water sources from fellow hikers.
Maroon Bells Four Pass Loop – In One Day
Located in the heart of the Rockies, just outside of Aspen, CO. The towing 14,000+ft Maroon Peaks are located in the Elk Mountain range. With the Four Pass Loop circling the two massive peaks. The trail never stops providing views from start to finish and this is one every endurance athlete should have on their list.
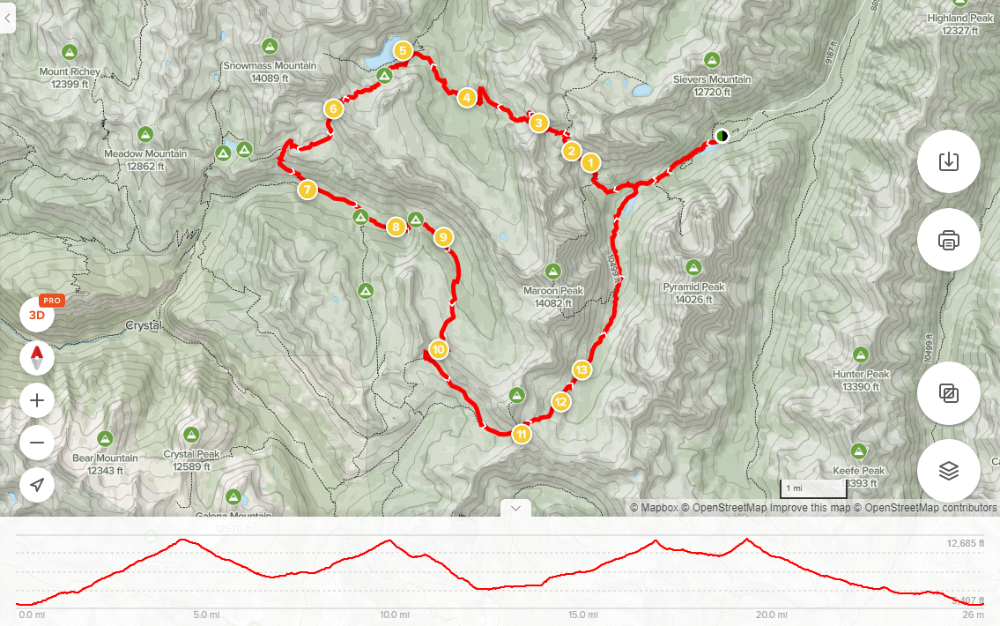
Four Pass Loop Trail Info
Total Distance: 25.7 Miles
Total Elevation Change: 15,000ft +
Elevation Gain: 7,500ft +
Elevation Decent: 7,500ft +
Highest Elevation Point on Trail: 12,490+ (North Rim)
Lowest Elevation Point: 9,500ft
Alltrails Link: Alltrails Link Click Here
The Four Pass Names:
Buckskin Pass – 12,460ft
Trail Rider Pass- 12,420ft
Frigid Air Pass – 12,400ft
West Maroon Pass -12,490ft
Official Info form the Forest Service, click here for the Forrest Service site.
Reservations are required to enter the Maroon Bells park durring high season, by road or shuttle. Find out more by clicking here for shuttle info. Road access for cars begins May 15th 2021.
Clockwise or Counterclockwise, which way do most people go?
Most people choose to do Maroon Bells Four Pass Loop counterclockwise in direction starting with Buckskin Pass. The reason for this is to get the hardest part of the trail over with first. Going this direction, once you make the 3rd pass over you don’t lose much elevation making the 4th climb relatively easy compared to the others. Then providing a more gradual downhill descent vs going the other direction.
When to do Four Pass Loop?
The best time of year to do the Four Pass loop is mid-June to September. This is also when the main road opens up allowing you to drive into the park. It should be noted that even during the summer months you can expect to find some areas with snow on the ground. And there is always the potential for a snow storm while on the trail.
Weather Info
The weather at 12,000ft can change rapidly and without much notice. During the summer, afternoon thunderstorms are a regular occurrence and can turn to freezing snow while making the passes. When we did the trail on 7/4/2020 the weather was 80 degrees at the parking lot while sleeting sideways on Frigid Air Pass. You should be prepared for everything.
It is recommended by the park rangers that you check the Weather.gov for the latest weather updates. You can get there by clicking here.
Water Info
One thing you wont need to worry about on the trail is where to find water. In fact, there are a few places where you may get your feet wet from the streams coming off snow melt. There are a lot of places to stop and filter water on the trail. Just make sure you bring your water filter and make sure you get water before you start the climbs over the passes. These will be the few places water may be hard to find. I always recommend having the ability to carry at least 2 liters of water.
Tip: Make sure to ask other people on the trail for info on where the nest water crossing/source is.
Conclusion
Hiking the Maroon Bells Four Pass Loop in one day offers a remarkable adventure through the stunning Rocky Mountains. This 27-mile trail, crossing four 12,000ft peaks with over 7,500ft of elevation gain, is a bucket list experience for outdoor enthusiasts. Choosing the counterclockwise route, starting with Buckskin Pass, can make the journey more manageable. The ideal time for this epic hike is mid-June to September, but prepare for unpredictable high-altitude weather. Water sources are abundant, but carrying a water filter and seeking advice from fellow hikers is a smart move. This adventure is a test of endurance and an opportunity to immerse yourself in the breathtaking beauty of the Maroon Bells and the Elk Mountain range. So, gear up, be prepared, and embark on an unforgettable journey through this extraordinary wilderness.