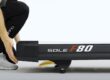
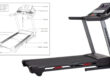
Recently I’ve received a few emails in regards to how to disassemble the Sole F63 treadmill for moving. One of the most popular treadmills on the market. The F63 is an incredibly well built machine (with a great warranty to match) at a friendly price point. And because the treadmill lasts as long as it does, many people find themselves needing to move the treadmill at some point. But without any specific disassembly instructions, a lot of people are left to tackle it alone. So to better help everyone, I’ve revered the official assembly instructions, providing images with numbered corresponding parts to make it easier.
You can download the official Sole F63 Manual here.
A Step by Step Guide on How to Disassemble the Sole F63 Treadmill
Tools You Will Need
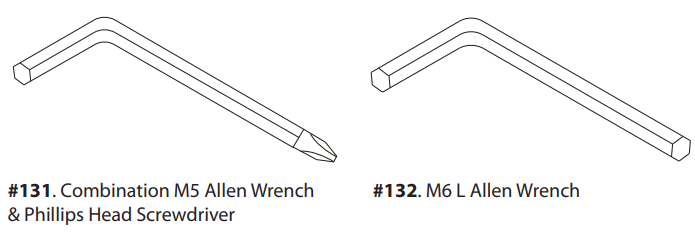
You will need a Phillips Head Screwdriver and an M6 Allen Wrench.
Step 1: Remove the Tablet Holder
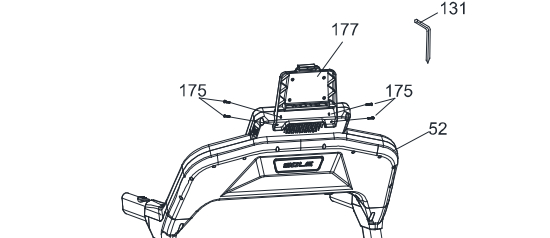
Use the Combination M5 Allen Wrench & Phillips Head Screw Drive (131) to remove four of Sheet Metal Screw (175) from the Console Assembly (52). Then gently remove the Tablet Holder.
Step 2: Remove Console Mast Cover (Frame Base Caps) from the Frame Base
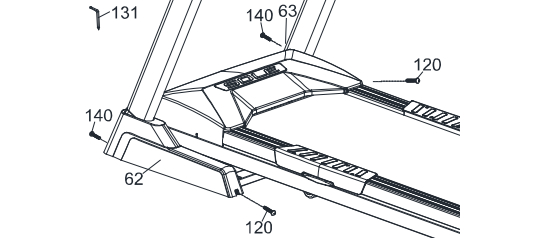
Remove the Console Mast Cover (62 & 63) from the Frame Base by removing two tapping screws (120) and two Phillips head screws (140) from the cover. These will remain on and lose until later.
Step 3: Removing Support Tube
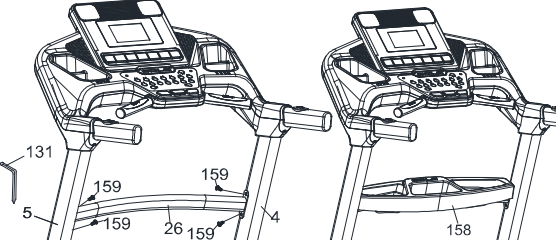
Start by removing the treadmills safety key (75). First lift the Beverage Holder (158) on top of the Support tube (26). Then loosen and remove the four Button Head Socket Bolts (159). Then remove the Support Tube (26) from the two upright tube (4 & 5) supports.
Step 4: Remove left & right Handlebar Covers
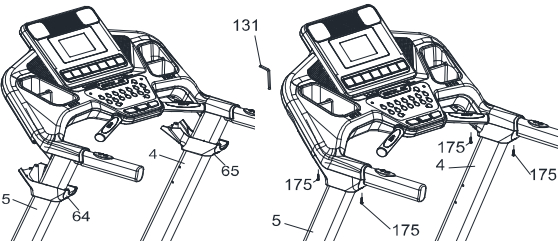
Use the Combination M5 Allen Wrench & Phillips Head Screw Driver (131) to remove the Sheet Metal Screws (175) holding the Left (64) and Right (65) Handlebar Covers to the top of the Upright Tubes (4 & 5). Then lower them, we’ll remove these later.
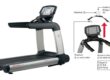
Step 5.1: Removing Console Assembly Assembly from Base
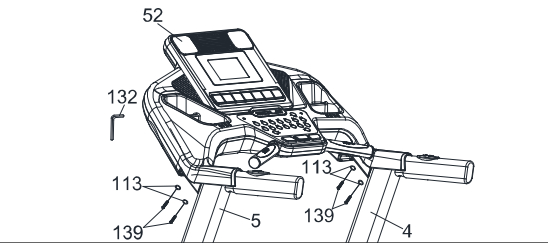
*Important* Once you remove the Console Assembly you want to be careful not to tear the connected wires. There will not be a lot of extra length on the wires once you lift the console. So having someone to hold the console or something to place it on close to the base is recommended.
Use the M6 L Allen Wrench (132) to remove four Button Head Socket Bolts (139) and four Split Washers (113) from the Upright Tubes (4 & 5). Then gently lift/remove the Console Assembly (52) from the Upright Tuber (4 & 5).
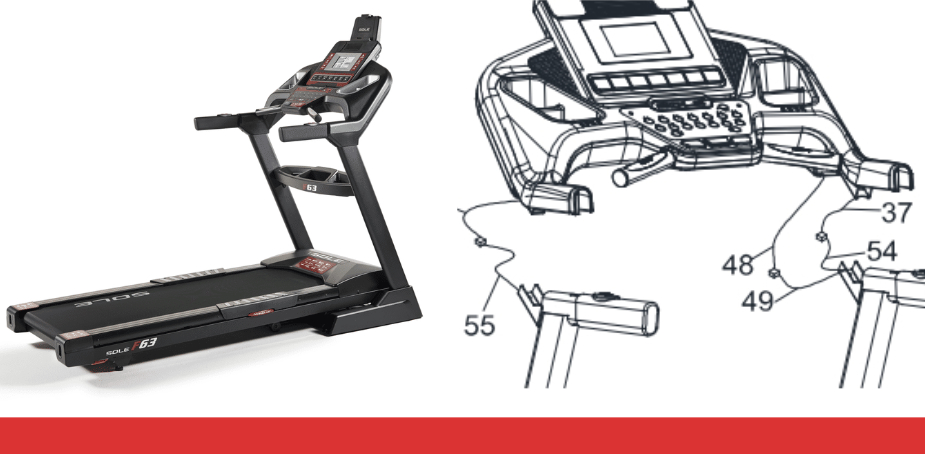
Step 5.2: Disconnect Cables
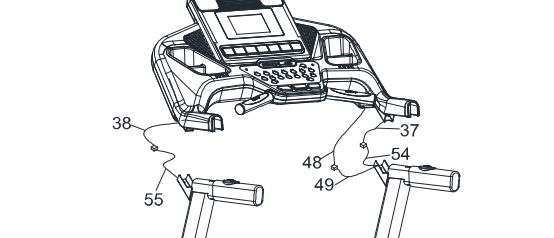
Disconnect the Speed Adjustment Switch Cable (54) from the Speed Cable, Upper (37). Then disconnect the Incline Adjustment Switch Cable (55) from the Incline Cable, Upper (38). Lastly disconnect the Computer Cable, Middle (49) and Computer Cable, Upper (48).
Step 6.1: Remove Upright Tubes from Frame Base
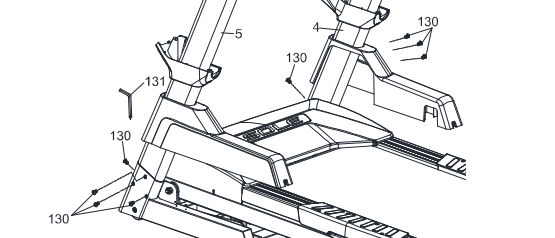
*Important* When removing the Upright Tubes be careful of cables with very little extra length. These will be disconnected in the next step.
Use the Combination M5 Allen Wrench & Phillips Head Screw Driver (131) to remove eight Button Head Socket Bolts (130) that connect the Upright Tubes (4 & 5) onto the Frame Base (2) and then lift the tubes.
Step 6.2: Disconnect Cables and Remove Caps
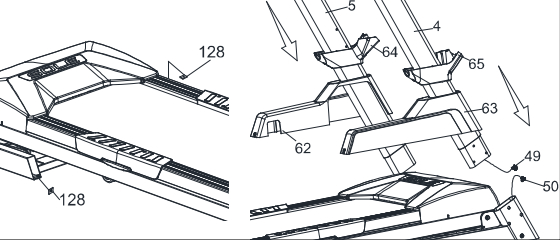
Disconnect the Lower Computer Cable (50) to the Middle Computer Cable (49) located on the right side of the unit. Then remove the Frame Base Caps (62L & 63R) and the lower handlebar covers (64 & 65). Lastly remove the two Speed Nut Clips (128) on the left and right sides of the Frame Base.
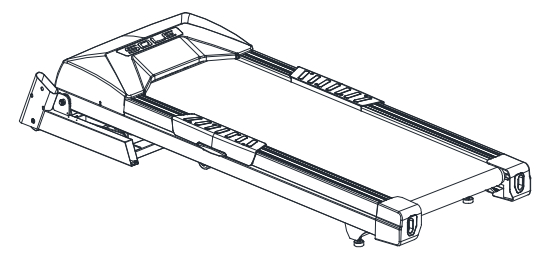
That’s it! Will now be left with the base motor and tread unit. Which should be much easier to transport.
Conclusion
disassembling the Sole F63 treadmill for moving doesn’t have to be a daunting task. This popular and well-built treadmill is known for its durability, and when it comes time to relocate it, we’ve got you covered. We’ve carefully reversed the official assembly instructions, complete with images and numbered parts for easy reference. Here’s a concise summary of the steps:
Step 1: Remove the Tablet Holder Use the Combination M5 Allen Wrench & Phillips Head Screwdriver to remove the Tablet Holder by taking out four Sheet Metal Screws from the Console Assembly.
Step 2: Remove Console Mast Cover from the Frame Base Remove the Console Mast Cover from the Frame Base by taking out two tapping screws and two Phillips head screws from the cover. Keep these screws for later use.
Step 3: Removing Support Tube Start by removing the treadmill’s safety key. Lift the Beverage Holder on top of the Support Tube, then loosen and remove four Button Head Socket Bolts. Remove the Support Tube from the two upright tube supports.
Step 4: Remove Left & Right Handlebar Covers Remove the Left and Right Handlebar Covers by using the Combination M5 Allen Wrench & Phillips Head Screwdriver to take out the Sheet Metal Screws holding them in place.
Step 5.1: Removing Console Assembly from Base Use the M6 Allen Wrench to remove four Button Head Socket Bolts and four Split Washers from the Upright Tubes. Carefully lift and remove the Console Assembly from the Upright Tubes.
Step 5.2: Disconnect Cables Disconnect various cables: Speed Adjustment Switch Cable from Speed Cable, Incline Adjustment Switch Cable from Incline Cable, and Computer Cables.
Step 6.1: Remove Upright Tubes from Frame Base Remove eight Button Head Socket Bolts that connect the Upright Tubes onto the Frame Base. Lift the tubes, being cautious of cables with limited extra length.
Step 6.2: Disconnect Cables and Remove Caps Disconnect the Lower Computer Cable from the Middle Computer Cable. Remove Frame Base Caps and lower handlebar covers. Lastly, remove the two Speed Nut Clips on the left and right sides of the Frame Base.
With these steps completed, you’ll be left with the base motor and tread unit, making transportation much more manageable. For further guidance, you can download the official Sole F63 Manual. Happy moving!