Since its newest model released in 2022, Nordictrack Treadmill 1750 has been one of the hottest on the market. That also means that there have been plenty of them popping up on the secondary market as well. But buying a second hand treadmill or just relocating in general means having to move the treadmill. So how do you disassemble the Nordictrack Treadmill 1750 for moving?
The way the 2022 model is designed, means that some of the pieces are incredibly difficult to get off the unit without breaking. This isn’t a huge issue. I recommend just removing the main center handrail assembly and side rails together. So that’s what we’ll cover below. Let’s get to it!
Official manual link!
A Step by Step Guide on How to Disassemble the Nordictrack Treadmill 1750
Step 1. Remove Right & Left Base Cover
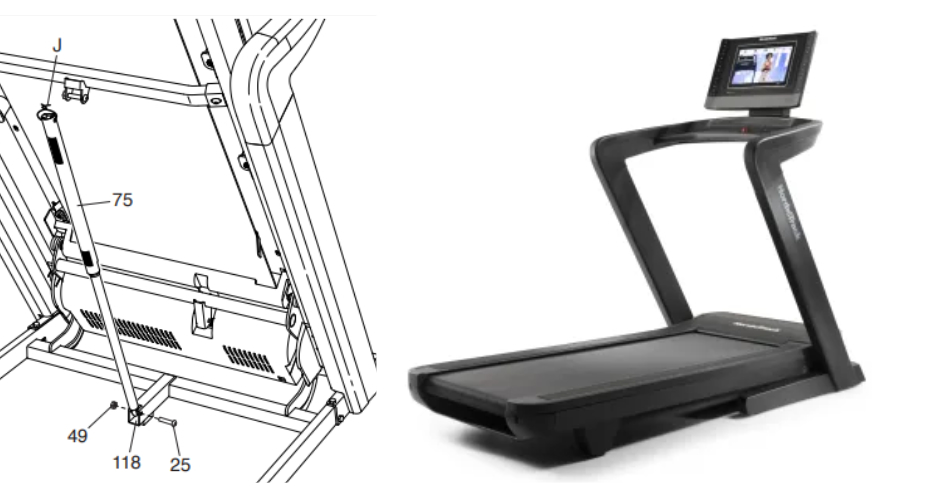
The first step in removing the left and right base covers (121). To do this, just lift the base cover and then pull it out through the front of the treadmill. With the right base cover make sure not to pull out the power cord.
Step 2. Remove the Deck Lift Storage Latch Upper Bolts
*IMPORTANT: Do not raise the Frame past the vertical position. Have a second person hold the Frame until step 5 is completed. If the treadmill is assembled on a smooth surface, it may roll forward during these steps.
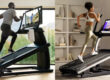
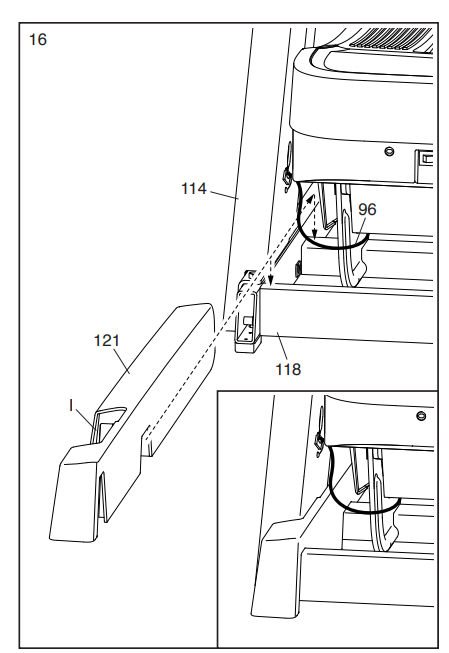
Lift the deck to its stored position. Again, for the next part make sure to have someone hold the weight of the treadmill base so that it doesn’t fall on you. Now you are going to remove the nut (49) from the bracket (27) that is connected to the Storage Latch (76) and Latch Crossbar (75).
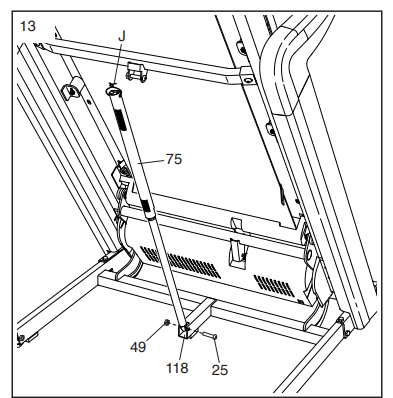
Step 3. Remove the Deck Lift Storage Latch Lower Bolts
After removing the top bolts you will do the same for the lower bolts of the Storage Latch (75). Remove the nut (49) from the bolt (25) connecting to the base (118). Then remove and store the Storage Latch.
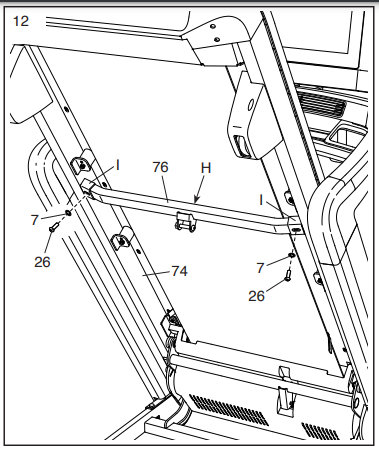
Step 4. Remove Latch Crossbar from Under Base
Next we will be removing the Latch Crossbar (76). To do this you will remove two screws (26) and washers (7) from each side of the crossbar. Where it connects to the bases frame on the left and right side.
*You can now lower the base of the treadmill back down.
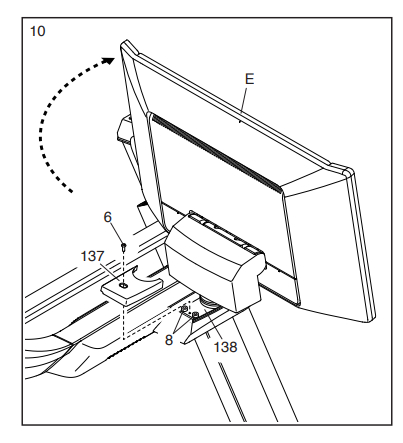
Step 5. Remove Right & Left Screen Pivot Covers
To remove the left and right Pivot Covers (137) you will need to rotate the screen. Rotating the screen to the left, to remove the right cover. There is one screw (6) holding the cover in place. Now turn the screen to right and remove the left pivot cover.
Step 6. Unscrewing Console Assembly from Treadmill
Make sure you have a grip on or have someone help hold the Console Assembly for this step. Removing the console assembly (E) from the base (D) takes a couple of minor steps. Now remove the 4 screws (138), 2 on the left and 2 on the right, holding the console assembly in place.
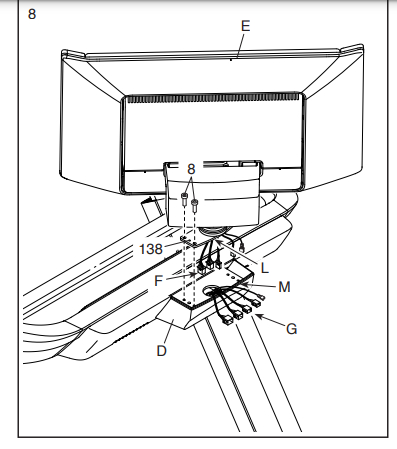
Step 7. Removing Console Assembly from Treadmill
Make sure you have someone help hold the Console Assembly for this step. For this step you will be lifting the Console Assembly and disconnecting the wires connecting it to the base. So once you have the center console unscrewed, lift it a few inches off of the base to expose the wire connector. Disconnect the wire connections then set the Console Assembly someplace safe.
Step 8. Removing the Handrail Assembly in one Piece
Make sure you have someone to help hold the center and side rails while you are unscrewing them. First from the front of the treadmill. Disconnect the power wire (120) located in the lower left side rail (114). You may have to fish the wire out. Once disconnected you will remove the 4 screws (1) and washers (9) from both the left and right sides. Connecting the side rails (114) to the base(118) Be careful of the cord.
From here you should be ready to move the treadmill easily and safely. Here is the manual link!
Conclusion
when it comes to moving the NordicTrack Treadmill 1750, disassembly is the key. While the 2022 model’s design may present some challenges, we’ve got you covered with a step-by-step guide on how to disassemble it for a smooth relocation. We recommend removing the main center handrail assembly and side rails as a unit to simplify the process. Here’s a summary of the steps:
Step 1: Remove Right & Left Base Cover Start by removing the left and right base covers, ensuring you don’t pull out the power cord while doing so.
Step 2: Remove the Deck Lift Storage Latch Upper Bolts Lift the deck to its stored position, and then remove the nut from the bracket connected to the Storage Latch. Make sure someone supports the weight of the treadmill base.
Step 3: Remove the Deck Lift Storage Latch Lower Bolts Repeat the process for the lower bolts of the Storage Latch, removing the nut and storing the latch.
Step 4: Remove Latch Crossbar from Under Base Remove the Latch Crossbar by taking out the screws and washers on each side where it connects to the base’s frame.
Step 5: Remove Right & Left Screen Pivot Covers Rotate the screen to remove the left and right Pivot Covers, with one screw holding each in place.
Step 6: Unscrewing Console Assembly from Treadmill Remove the 4 screws holding the console assembly in place, ensuring you have a firm grip or assistance to hold it.
Step 7: Removing Console Assembly from Treadmill Lift the Console Assembly to expose the wire connector and disconnect the wire connections before safely storing the Console Assembly.
Step 8: Removing the Handrail Assembly in one Piece With assistance, unscrew the side rails from the base, disconnect the power wire, and remove the screws and washers holding the side rails in place.
Following these steps, you’ll be ready to move your NordicTrack Treadmill 1750 with ease and without worries. For additional reference, you can find the official manual link. Safe moving!