Moving a treadmill is never easy. But with the following instructions on how to disassemble a Proform Pro 5000 treadmill. It doesn’t have to be hard. What I’ve done is take the original manual and revered it. Including images from the book, you will see where all the screws and bolts are hidden. I’ve also included what tools are needed. And if you have any questions at all, let me know in the comments below!
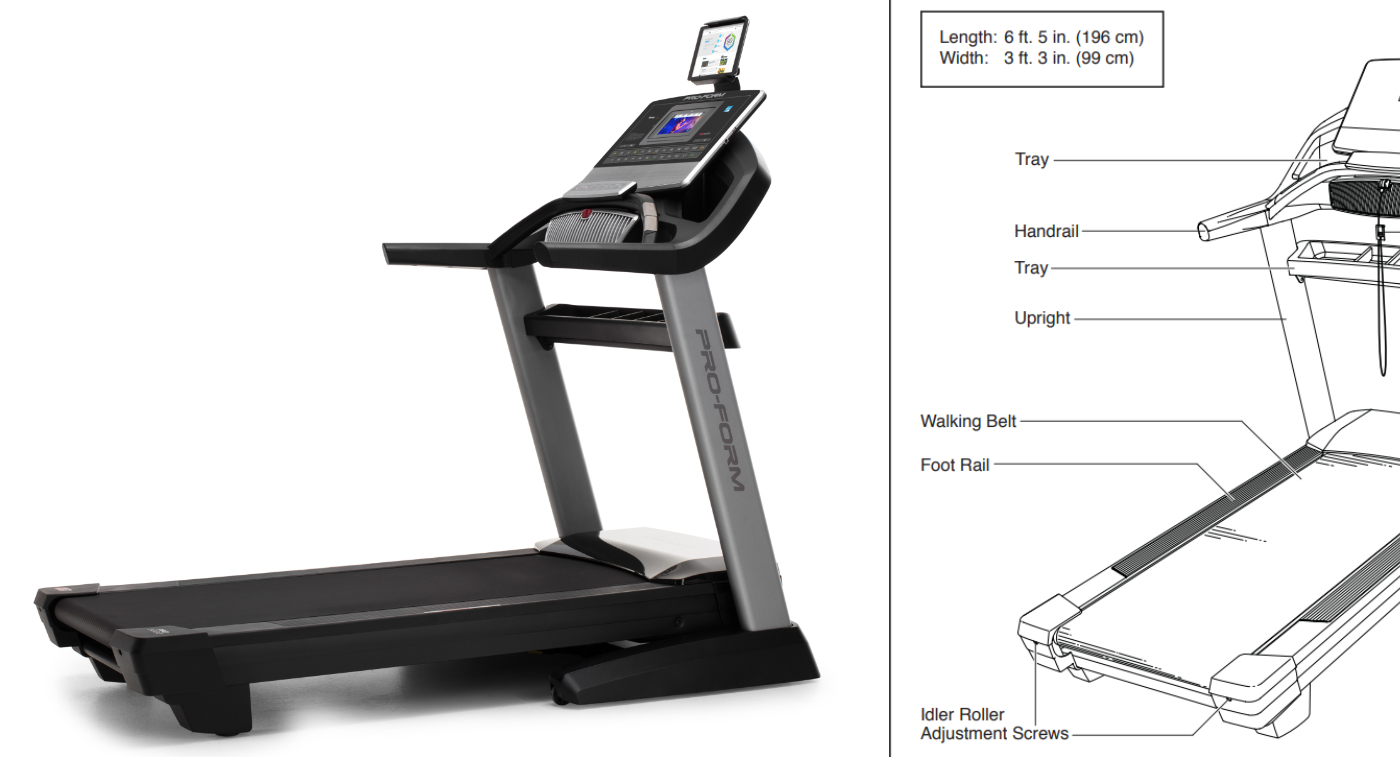
A Step by Step Guide on How to Disassemble a Proform Pro 5000 Treadmill
Tools Needed
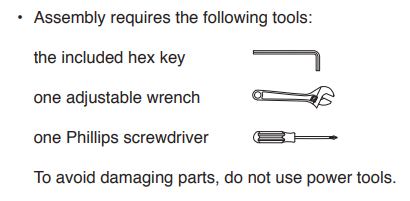
- Hex Key
- Adjustable Wrench
- Phillips Head Screwdriver
* Do not use power tools.
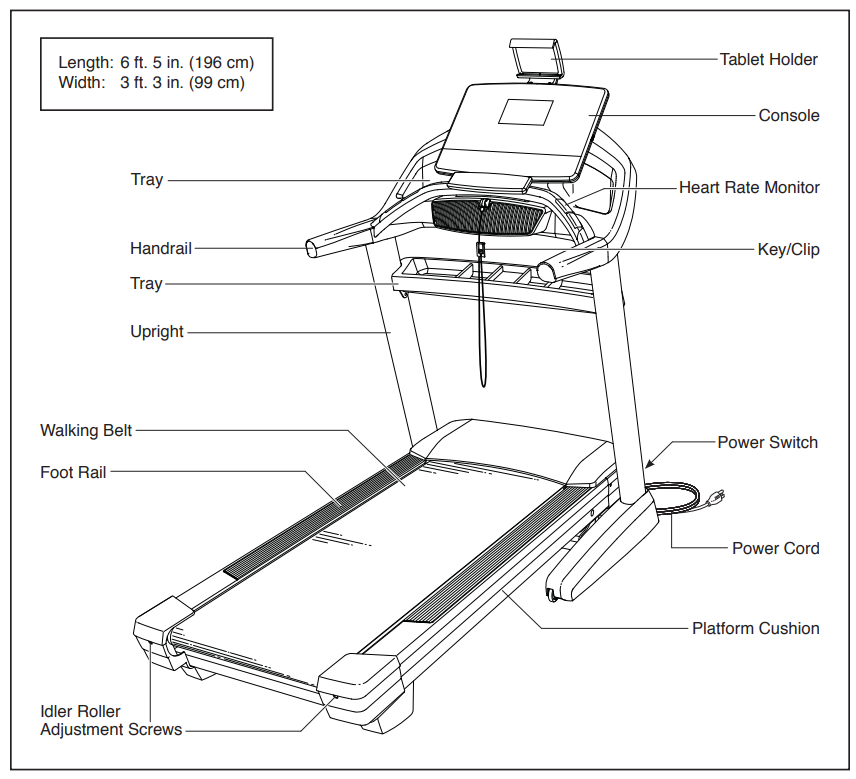
Instructions – How to Disassemble a Proform Pro 5000 Treadmill
Before you start, make sure the treadmill is powered down and unplugged from the wall.
Step 1. Remove the Tablet Holder
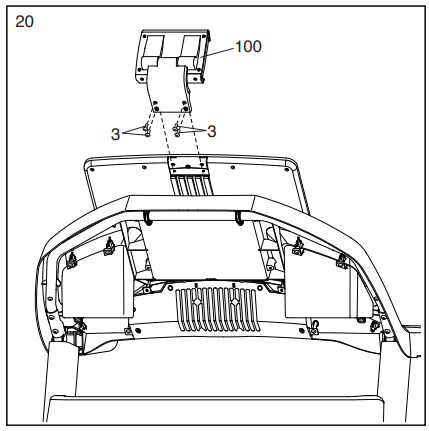
The Tablet holder (100) is held on by 4 screws (30) located on the backside of the treadmill console. You can use a screwdriver to remove these.
Step 2. Remove Folding Storage Latch
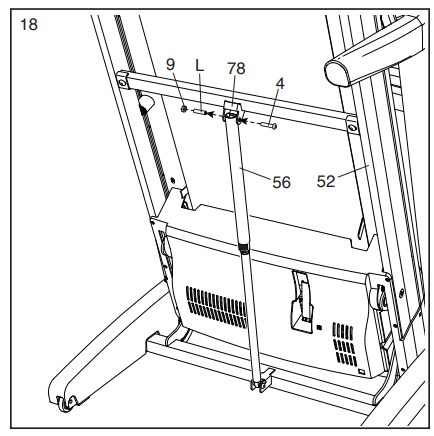
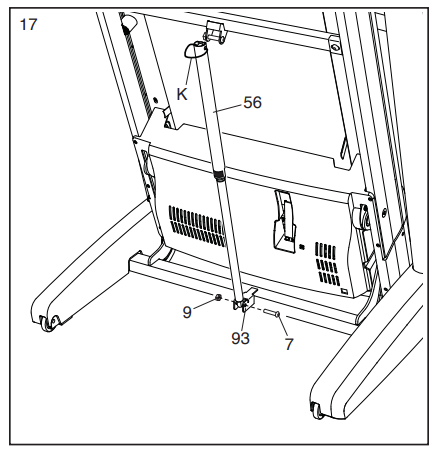
* For this step you are going to want to have someone help you hold the treadmill up. WHile you remove the latch bar.
To start, raise the treadmill to a folded stored position. The Storage Latch (56) is bolted in at both the top and bottom. As you can see in the images. Using a hex wrench remove the bottom (9 & 7) then top blots (9 & 4). Keep the treadmill lifted for the next step.
Step 3. Remove Latch Crossbar
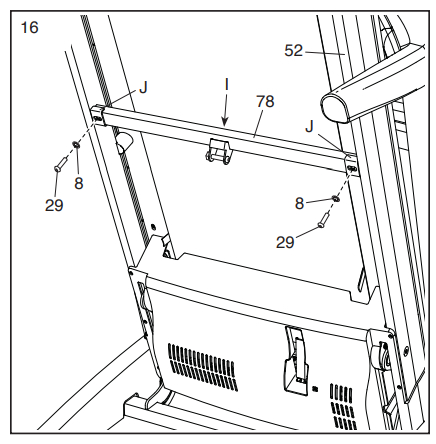
Next we are going to remove the Latch Crossbar (78). The Latch Bar is attached to the bottom of the frame with two washers and bolts. One on each side of the bar. Once you remove these two bolts the bar comes right off.
Now you can lower the treadmill back down.
Step 4. Removing the Tray from Upright Crossbar

The Tray (97) is attached to the Upright Crossbar (76). To remove the tray, you will need to remove four screws (24) holding in place. Two screws are located on each side of the tay near the frame rail. On the bottom site of the tray.
Step 5. Remove the Upright Crossbar

Running across the treadmill is the Upright Crossbar (76), which is held in place with four screws (1). Two on each side of the bar connecting it to the left and right uprights (84, 91). To remove the bar, just use your screwdriver to remove the screws and gently pull out the Upright Crossbar.
Step 6. Remove Left and Right Trays from Console
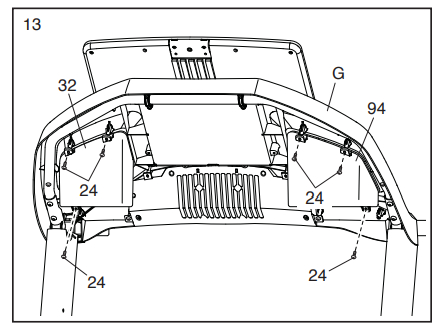
The left (94) and right (32) console Trays are held in place by three screws each. Located on the backside of the console. You can use a screwdriver to remove the six total screws (24) and lift out the trays.
Step 7. Remove Left and Right Handrail Bottom Covers
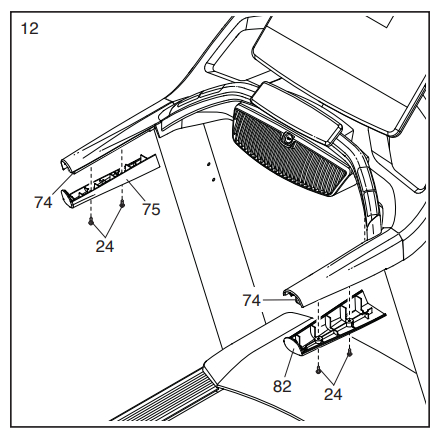
On the bottom side of both the left (75) and right (74) handrail, there is a cover that comes off. Each is held on by two screws. Four screws in total (24). Remove these and set them someplace safe.
Step 8. Remove Left and Right Handrail Top Cover
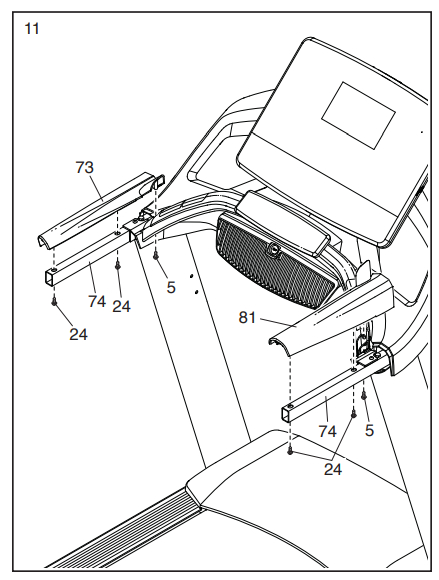
To remove the top left (73) and right (74) you will need to unscrew three screws on each side. Six screws (24) in total. Once you unscrew the 6 screws just lift off the two covers and place along with the bottom covers someplace safe.
Step 9. Unscrew the Pulse Crossbar
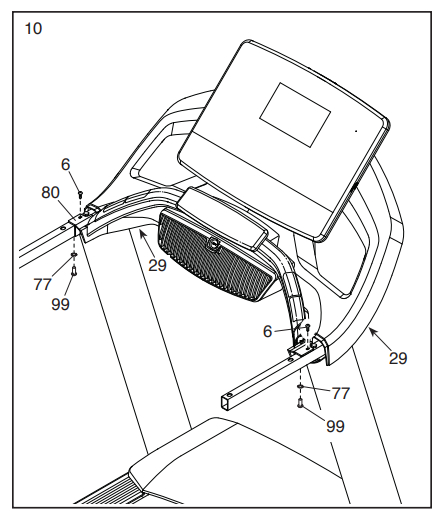
The Pulse Crossbar (80) runs across the front bottom of the console. There are two screws holding each side in place. And we are going to remove these in preparation for removing the console. First remove the bottom screws (99) and washers (77) on each side. Then remove the top screws (6) from the top of each side.
Step 10. Cut Wire Tie
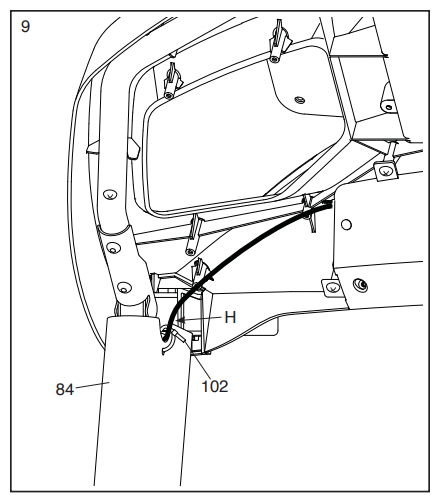
If you or your installer followed the directions, you properly fastened the power wire to the frame using a provided Wire Tie (102). If this is the case, you are going to cut this Wire Tie so you can pull up the wire connector.
Step 11. Disconnect Console Wire
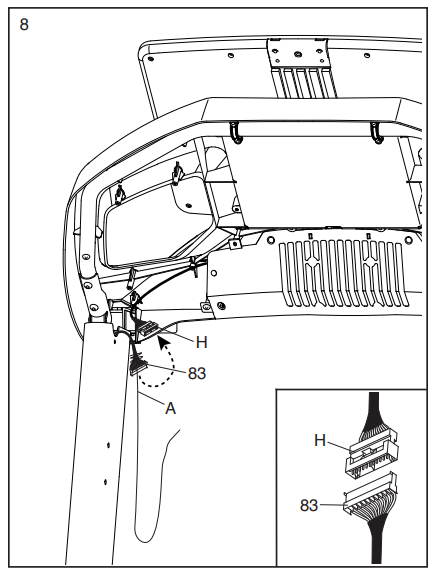
Once you have cut the wire tie as listed in the directions above. The next step is to lightly pull the cable connection from out of the rail. Then disconnect it.
Tip: Tape the end of that cable to the top of the rail and the other to the back of the console. We will do more with the one connected to the base in a minute.
Step 12. Remove Main Console Assembly From Base
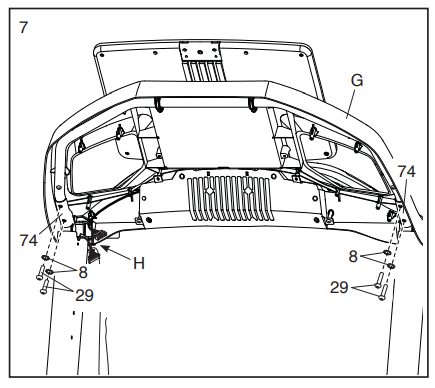
* You may want to have someone help and hold the console while you unscrew it from the base.
Next we are going to remove the main console. So make sure you have somewhere to place this once you take it off. The Main Console Assembly (G) is held to the main handrails (74) by four bolts (29) and washers (8). Two on each side running through the back of each hand rails. Again, be careful taking this off. Once you start unscrewing the console assembly it can become loose and fall.
Step 13. Remove Left and Right Hand Rails

Both the left and right handrail bar is being held in by two bolts (2) with washers (8). Using the hex wrench, remove the four total screws (two each side), and then rails will come off. Make sure not to lose these bars.
Step 14. Lift Off Left and Right Upright Covers
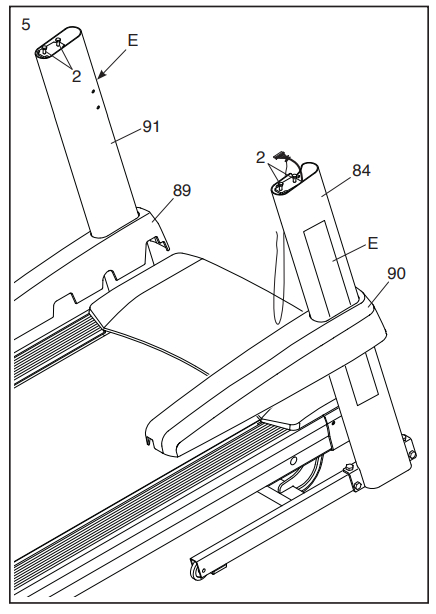
The left (89) and right (90) upright covers are located at the base of the treadmill covering the bottom supports. They are snapped into place. So to remove them you will have to gently pull down and away on both the front and back. Be careful. Once unsnapped just pull it up and off the support rail (E).
Step 15. Remove Uprights
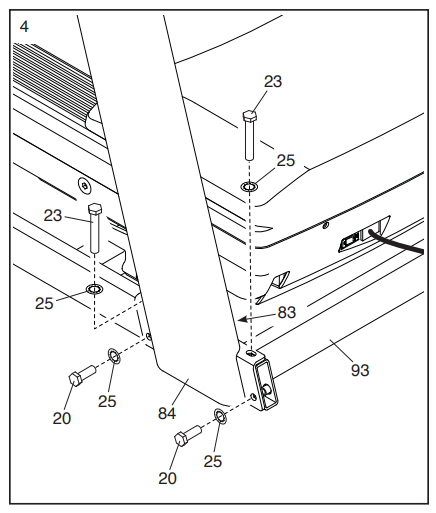
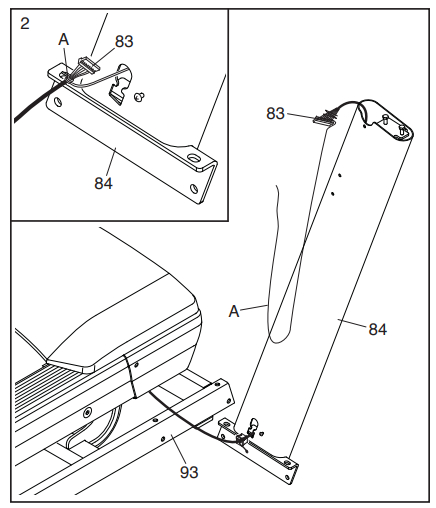
* After this next step we are going to be running the control wire though the frame rail. To make it easier to set up, I recommend attaching a long string to the console wire before pulling it out. And after you pull it through, keep one side of the string taped to each end of the side rail. This way you can pull the console wire through easily when setting it back up.
Important: There is a ground wire attached to the right upright. Do not pull it away from the base unit until the ground wire is unscrewed.
Each Upright is held on by four bolts (20 & 23) and washers (25). You will need a wrench to remove these bolts. Remember, the console wire runs down the right upright. So be careful when removing this side. Use the tip above for an easier time running the console cable when you reinstall the treadmill.
Step 16. Unscrew Ground Wire
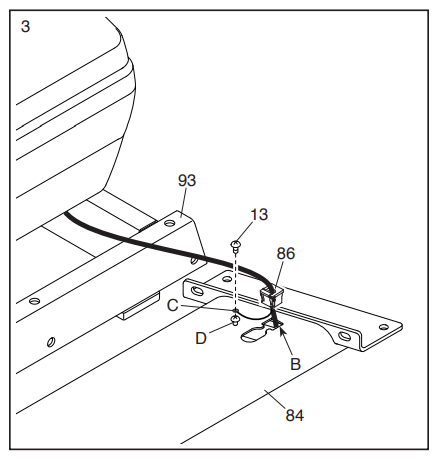
Use a screwdriver to remove the one screw (13). And then pop out the ground cable connection from the upright.
And that’s it!
Conclusion
In conclusion, we’ve provided you with a comprehensive step-by-step guide on how to disassemble a Proform Pro 5000 Treadmill. With the right tools and careful execution, you can successfully break down this treadmill for maintenance or transport. Remember to follow the instructions closely, exercise caution, and seek assistance when needed, especially when handling the console assembly. If you have any questions or need further clarification, feel free to leave a comment below. Happy disassembling!